Developing a Signature Look: The Complete Guide {Part II}
This post is the second of a two-part mini series. Click here to read Developing a Signature Look: The Complete Guide {Part I}.
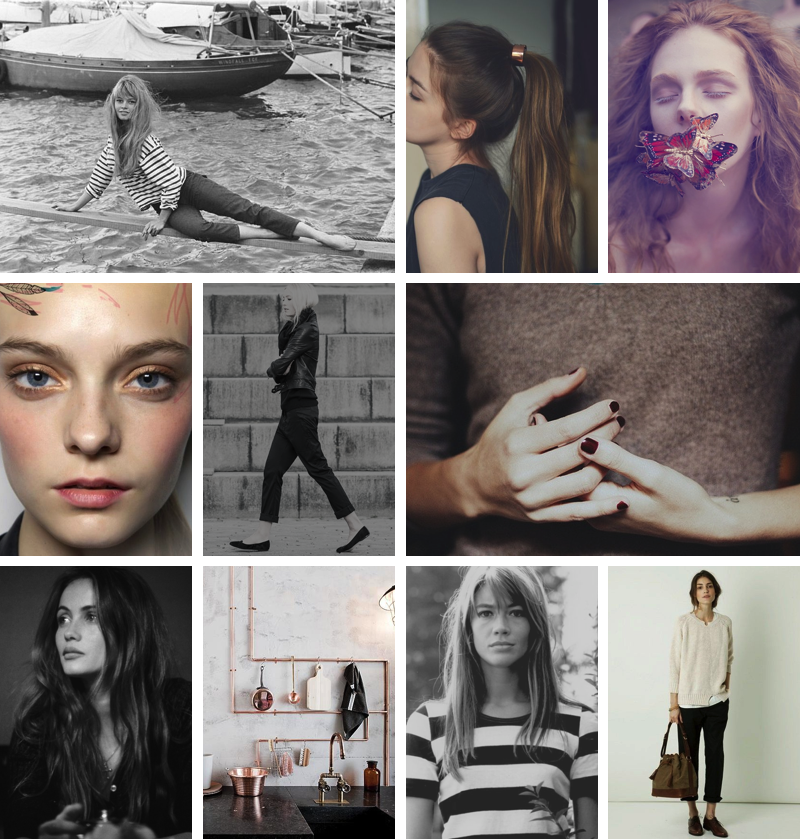
After the WHY I now want to get into the HOW of signature looks: How to develop your own signature look, one that expresses your personal style and suits your lifestyle. How to start with a basic mood board like the one above and turn it into a complete, wearable look in 4 steps. Now, creating something as personal as a signature look can never be a linear process and of course there is no single way to do it. I tried to distill the major components into tangible steps but, as always, feel free to pick out whichever bits you find most helpful and adjust the rest. Here is an overview of the steps:
A signature look in four steps
As with all things wardrobe building, the two factors to keep in mind are form and function. Before you can start sketching out the individual components of your signature look you first need to figure out exactly what form and function mean to you: what is the essence of your style (form) and what are your wardrobe needs (function). Step 1 will help you refine your style concept and extract the three pieces of information you need to create your signature look. Step 2 is all about figuring out which functional criteria your signature look needs to fulfil. Step 3 is where the real magic happens: where you combine form and function to design your signature look, from the main items to the finishing touches. Step 4 will then give you some ideas on how to best implement your new look into your wardrobe.
Some tips before you start
Designing a signature look is a very creative process and you will need to do a lot of iterations until you arrive at the final look. Make sure you have set up a comfortable and inspiring work space for yourself that allows you to view a lot of images and notes at the same time, either on your screen or on a desk (if you have a colour printer and can print your inspiration images). Be prepared to take a ton of notes, rewrite your ideas and cull bad ones.
Step 1: Refine your style concept
The first prerequisite for developing a signature look: your style concept. Now, your style concept does not need to be a masterpiece yet, fully formed and stable for multiple seasons. For most people their style concept will remain a work-in-progress for several years and that is ok. Creating a signature look for your current likes will help you define them in detail and ultimately allow them to evolve and develop.
Before you get to work on your signature look, reserve an afternoon for an extensive inspiration session and build a huge mood board full of images that inspire you in some way in regard to your style. Aim for coherence and only allow images on your mood board that you truly love - no fillers. Then: Use your mood board to build a style concept. Read this post for an overview of all the different components of a good style concept. For the purpose of creating a signature look, focus on the first three components only (ignore the others for now):
- the mini mood board that represents the aesthetic feel of your style concept
- the list of element
- the colour palette
If you have never built a style concept before, take your time with this first step - spread it out over a couple of days and let your ideas develop. Sometimes, a little bit of incubation time does wonders for our level of creativity.
Step 2: Figure out your wardrobe needs
Apart from your style, your signature look should also be tailored to your body, colouring and lifestyle, i.e. your everyday activities. Everyday? Yes, I believe your signature look should not be one that you wear twice a month for special occasions. As the flagship look for your overall style it should play a major part in your rotation of outfits and be suitable for everyday wear.
To do: Write a set of guidelines for your look. What practical elements does it need to include, what climate does it need to be tailored to, which things do you plan on doing while you wear your signature look, what kinds of things do you like on yourself (soft shades and high-waisted trousers, etc.) and what not (bright yellow, large patterns, etc.)? Also consider how closely you want to define your signature look: do you prefer a greater level of variety in your outfits or do you want a very defined, strong look based on a set of specific items?
Step 3: Build a 5-component signature look
This third step is where you combine all of the information and inspiration you have gathered into a single outfit. Now, an outfit or a look is essentially just a combination of several different elements that you stack on top of each other. The output might be an abstract piece of art but the process of putting it together is really rather basic: start with the foundation, add some furnishing, add finishing touches, then step back and review. In this step you will be using this exact principle to design your signature look, component by component, from the bottom up.
Any outfit can be dissected into five components: proportion, colour, accessories, hair & make up and details. Put your style concept, mood board and notes on your wardrobe needs in front of you, then go through each component and ask yourself the following two questions:
- Which proportion/colour palette/accessories/hair & make up/ details best represent the overall aesthetic of my mood board and style concept?
- Do my chosen proportion/colour palette/accessories/hair & make up/ details work with my colouring, body and lifestyle?
In a nutshell: For each component, find the best representation for your style concept, filter it through your wardrobe’s needs, then move on to the next. Once you have written down some suggestions for each component, compare how they would all work together and adjust. Remember: This is not supposed to be a linear process, you will have to go back and forth several times, just like a stylist or an art director would, and adapt things, tweak and fine tune. Your final product should be a complete signature look with a full description of every item and possible alternatives.
To illustrate each component and the process a bit better, I will show you which elements I would extract from the sample mood board above + the final signature look.
A. Proportion
The proportion of a look is its most defining feature and should be chosen first. A proportion is nothing but a combination of specific item categories, for example a longsleeve, loose-fitting sweater + flared mini skirt + long-line, tailored coat or slim-fitting jeans + loafers + t-shirt + cropped jacket.
If your mood board does not contain a lot of outfit photos, finding a certain proportion to represent your style concept can be a little tricky. Ask yourself: if someone walked right out of that world, your style concept, what kind of outfit would they be wearing? A suit or a loose maxi dress? Jeans and a t-shirt or lots of layers? Check out the Proportions Catalogue if you need more inspiration. Function is a key factor for this component, so make sure your chosen proportion is 100% tailored to the climate of where you live and your activities.
Example: The proportion that definitely stands out from our sample mood board is cropped, relaxed-fit pants + a loose-fitting shirt + flat shoes. The leather jacket from the middle picture could be an optional topper.
B. Colour
Extracting a colour essence from a mood board is usually a little easier and more intuitive than extracting a proportion. Inspect the colour palette you have created as part of your style concept, narrow it down to about 2 - 4 colours and then compare your chosen shades to your own colouring. Do they suit your skin tone, hair and eye colour or do you need to tweak them a little? Click here for suggestions on how to tweak a colour palette to your colouring without losing its overall aesthetic.
Example: The colour palette of the sample mood board is relatively muted and deep. I would extract black and burgundy as the main colours and my first choice for key pieces (jackets, pants or shoes), and a light creme as a neutral. Rose gold, gold and a brighter red would make great accent colours, worn either as accessories, make up, nail polish or paired in small doses with neutral pieces.
C. Accessories
Once you have selected the base of your signature look, its colour palette and proportion, you can move on to the finishing touches and details. Refer to your mood board and your list of elements and ask yourself: Which accessories could I supplement my proportion with to better match the overall feel of my style concept/ mood board? Think jewellery, belts, scarfs, gloves, bags. Remember: no accessories is also a statement.
Example: The sample mood board does not contain too many accessories, but we can use our colour palette and the overall feel of the mood board to select some criteria for accessories we need (like a bag), even if the final look is supposed to be relatively streamlined and simple. The rose-gold elements of the mood board could be represented by either a few pieces of delicate rose gold jewellery or a watch.
D. Hair & Make up
Next up: hair & make up. Would a bold red lip express the overall look you are going for or would a classic 10-Step face a la Bobbi Brown be a better fit? Your colouring is obviously a big factor to take into account here, but also your lifestyle: How much time are you able to devote to your beauty routine every morning? Do not aim for an elaborate routine, if you are more of a wash n’ go type.
Example: The beauty component is the easiest one to extract in this case: Deep red, burgundy nail polish + a wash of soft gold or bronze eyeshadow. Hair: long and strictly unstyled.
E. Details
Details like tucking hems, rolling up sleeves, patterns, textures and embellishments can completely transform an outfit so as a last step take some notes on the details you want to include in your look. If you prefer a more fluent signature look, these are definitely things you can vary from time to time, e.g. wear a stripy t-shirt one day, a stark white one the next.
Example: The mood board features two striped shirts and, since a marinière in black/cream fits our colour palette well, it could definitely be included in our signature look. Another important feature: rolled up hems and bare ankles.
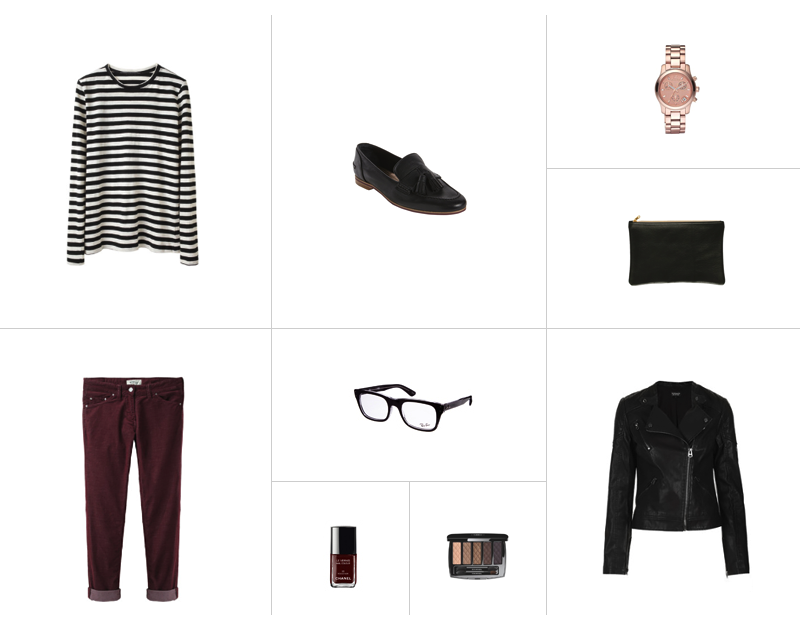
Here’s what a complete signature look for our sample mood board could look like:
Step 4: Implement your signature look
What comes after the design process? Yep, the implementation. Incorporating your fresh, new signature look into your wardrobe. Here’s how:
Practice, try it out, tweak some more
Get at least one version of each component of your look and work with it: Try on the full look, including hair and make up, experiment with a few details (e.g. tuck in your shirt, add some liner, etc). Remember that styling is a profession and therefore a skill that can and needs to be trained. While you are at it, pair a few of your signature look components with the rest of your wardrobe and write down the best looks so you have something to refer to later.
Stock your wardrobe
Once you are happy with your final look, aim to curate several items per component that you can mix-and-match. Depending on how fluent your signature look is, choose slightly different versions for your components or double up on items. If the above look was my own signature look I would aim for this constellation:
- 3 pairs of pants (all a relaxed-fit, in black, burgundy and a light creme shade
- 4 tops (two striped, one burgundy, one black)
- 2 pairs of shoes (one black, one burgundy)
- 1 watch (to wear every day)
- 1 eyeshadow palette (with a few different colours)
- 2 nail polishes (one in burgundy, another in either deep green or a deep marine shade)
- 2 clutch bags (one black, another in creme)
- 1 pair of glasses (black)
- 2 leather jackets (one in a shorter, loose fit, another that is a bit longer, but more tight-fitting)
As a final step, consider rearranging your wardrobe a little: Group all of your signature look items together and make sure you give them a good spot in your wardrobe (read: not the back of the shelf or crumpled up in a hard-to-reach drawer).
That’s it. I hope this little guide helps some of you! Leave a comment on this post or just send me an email if you have any questions. Happy Sunday!
Subscribe to INTO MIND via Email // Bloglovin' // Facebook // RSS // Pinterest
Where to find the above items: Leather jacket: Topshop , Corduroy Pants: Étoile Isabel Marant , Striped Shirt: Proenza Schouler, Glasses: Ray-Ban , Nail polish: Chanel (Rouge Noir), Eye shadow palette: Chanel, Clutch: American Apparel, Watch: Michael Kors, Loafers: Lanvin.